I can't remember where I found out about Nakashima Tomoaki's CLCL, but I do remember that I was sufficiently taken by the idea of a program that remembers a list of everything I copy onto the clipboard, whether it be snippets of text or whole files, that I downloaded and installed it straight away, and I've been using it every day since. A few months later I was able to get it set up to act as a quick launcher too, and I use that every day as well.
Despite being so useful, some of the installation instructions took me a while to work out (which explains the few months gap I just mentioned), so I thought I'd lay out here what I did to get this excellent program working.
First, and unsurprisingly, you need to download it. I got my copy at http://www.nakka.com/soft/clcl/index_eng.html. Download clcl112_eng.exe (or one of the other language variants, if they're a better match for you than English). While you're there, also download the two tool plug-ins, tool_text and tool_utl, and the three format plug-ins.
Now run clcl112_eng.exe. It's an installer, and by default unpacks into C:\Program Files\CLCL. You should find you've now got four new files: readme.txt, CLCL.exe, CLCLHook.dll, and CLCLSetup.exe.
CLCL.exe is the clipboard program. It needs to be manually launched, so I put a link to it into my Startup folder under the Start menu. If you run it now, you should notice a paperclip icon appearing in the taskbar. This is a shortcut to CLCLSet.exe.
CLCLSet.exe is a bit confusing. If you double click on the file icon in C:\Program Files\CLCL, it will bring up the CLCL Options dialog. However, if you click on it in the taskbar, you get the CLCL viewer instead. Also, if you right click on the paperclip icon, you get a pop-up menu containing the clipboard history, the Options dialog, and the viewer.
There are endless ways of configuring CLCL, so I will only describe what I've done with it. I find this works flawlessly (for me), so hopefully it will for you too.
Setting up the clipboard history
- Run CLCLSet.exe to get into the Options dialog.
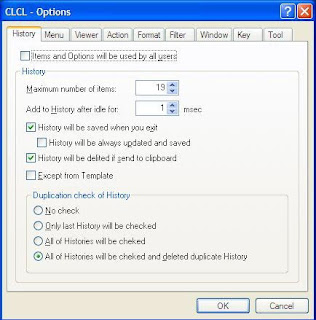
- Choose the Action tab.
- Click on Add...
- Set 'Action' to 'Menu' and 'Call type' to 'Alt + Alt'.
- In the 'Menu' area, click on the line marked '(New content)'. Don't be put off by it being greyed out.
- Now click on the 'Content' dropdown, and select 'History(Ascending)'.
- Hit OK.
You should now find that pressing ALT twice in quick succession will bring up a menu containing a history of everything you've put onto the clipboard since CLCL started running (and this history is retained from session to session).
Setting up the Quick Launcher
- Run CLCLSet.exe to get into the Options dialog.
- Choose the Action tab.
- Click on Add...

- Set 'Action' to 'Menu' and 'Call type' to 'Shift + Shift'.
- In the 'Menu' area, click on the line marked '(New content)'. Don't be put off by it being greyed out.
- Now click on the 'Content' dropdown, and select 'External Application'.
- Fill out 'Title' and 'Path' for an application of your choice; e.g. 'Python 2.5' and 'C:\Python25\python.exe'.
- Pick the executable for 'Icon path' too.
- Hit OK.
You have now added a quick launch for Python 2.5. Pressing Shift twice in quick succession should bring up a menu containing 'Python 2.5'.
Clicking on '(New content)' also allow you to add several other useful features, such as 'Options', 'Cancel', or sub-menus (via 'Pop-up menu').
The CLCL Viewer
I mentioned the CLCL viewer, that comes up when you left click on the paperclip icon in the task bar. The main use I make of this is to edit the contents of the clipboard.
CLCL Tools
Earlier on I said to download two tool plug-ins, tool_text and tool_utl. The tools inside them let you perform a variety of actions on selected text, such as wrapping in quotes, changing case, etc. I will now explain how to install these tools.
The download will give you two zip files. Unzip these and you should find a DLL in each one. There is also the source code and a text file, but these can be ignored. Move the DLLs to a sensible location, such as under C:\Program Files\CLCL.
Now bring up the CLCL options dialog again. Pick the Tools tab. Click on the Browse button and select one of the DLLs. Then select the first tool in the list that appears. Click OK twice to get back to the main dialog.
Repeat this until you have added all the tools in both DLLs. I'm afraid that I have not found a way to import all the tools in a DLL in one go.
To use these tools, go back to the instructions for setting up a quick launcher. Where it asks you to select 'External Application', select 'Tool' instead. In this way you can add the tools to your menus.
As well as the tool plug-ins, there were three format plug-ins. These will extend the range of formats available to CLCL, and to install them you have to perform these steps.
Unzip the downloads. Take the DLL in each one and move it to a suitable folder, such as the same one you put the tool DLLs into.
Bring up the CLCL options dialog. Pick the Format tab and click on the Add button. Now click on the Browse button and select one of the DLLs. This will bring up another dialog containing a list with one item in it. Select that item and then press OK twice to get back to the main dialog.
Finally
I hope these instructions prove useful to someone one day. Looking through the options dialog, I realise that there is plenty of stuff I still don't understand. The Window tab in the options dialog is a complete mystery, for instance. If anyone can illuminate that, or any of the other bits I've left out, please let me know and I'll add them to this guide.


